How to create an iBook on the iPad with Pages

20140905-200640.jpg

This last weekend I had to give a talk and unfortunately my printer refused to print! My next option was to use my iPad. I really did not want to use Pages on my iPad for my talk so I discovered that you can export a documents right from Pages into iBook! (With one small intermediate step) Once my document was in iBooks it was easy to increase the font size.  This made reading my notes was easy on the iPad.

Setting up the Document:

Before exporting to iBooks, I would recommend adding chapter headings to your document. I just used heading 1 and titled it Chapter 1. I added three chapters.

20140905-200615.jpg

Open Pages document in Another App:

Once you have the document finished you can export to another App.  Select the box with the arrow pointing up located in the upper right side of the screen as shown below.

20140905-200731.jpg

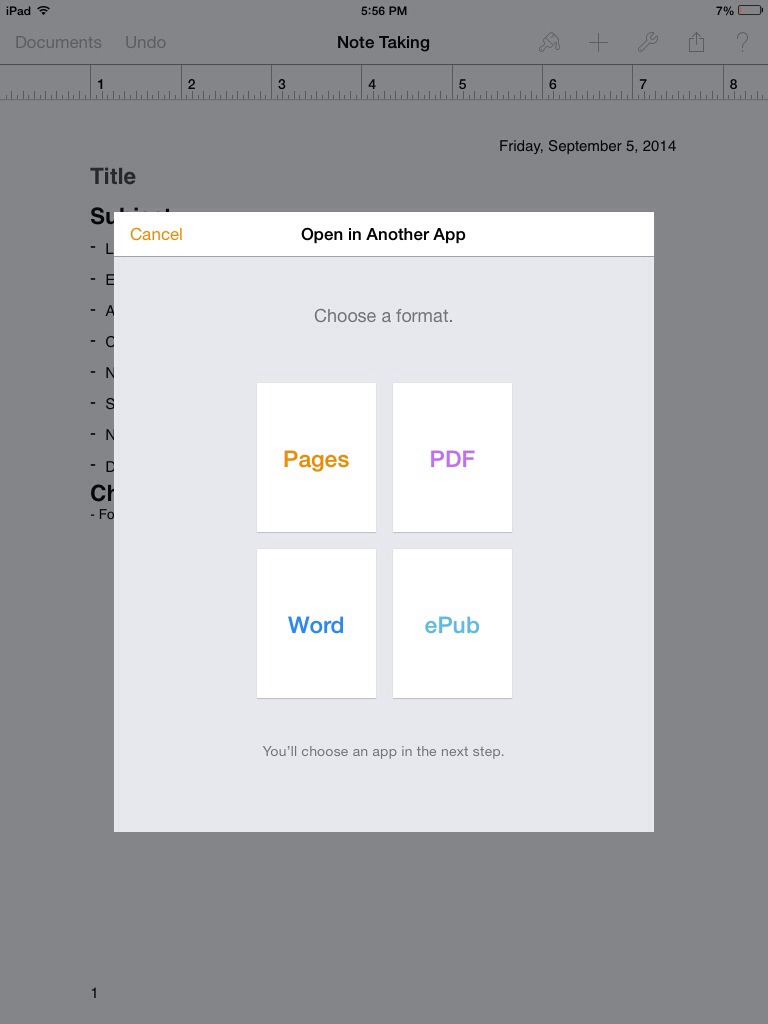
Choose ePub format for iBooks.

You are then offered several different format options.  You can either convert the document to PDF or ePub for iBooks.  I chose ePub since it allows you to increase or decrease the font size and it also allows for headings.

20140905-200640.jpg

You will then need to enter some information about your document. Important: Make sure that the option “Use the first page as the book cover image” is not selected! I accidentally selected this and found out that it makes the first page unreadable because you only see the first page when you look at the bookshelf.

20140905-200812.jpg

Your document will now be converted tot he ePub format which can be opened in iBooks.

Make sure you do not include important information in the header and footer since they are removed when Pages creates a ePub file.

20140920-175018.jpg

Select which App you want to use to view your document:

Select iBooks to open your Pages document in iBook.  Once opened the document is then saved to your iBooks bookshelf.

20140920-175047.jpg

20140920-175107.jpg

Now you have a simple ePub book that can be read in iBooks.


Creating copywork pages with iPad Pages

Copy work page created in Pages on the iPad

Yes it is possible to do work on the iPad. Of course there are limitations but for what I need it seems to be doing well. Copy work pages are a great use of the iPad. For one thing I don’t need to type a lot of text. Most of the text I copied and pasted into the document. I was initially woried that I would not be able to make guidelines for copying. I knew Pages on the iPad could make a table but I couldnt tell from the documentation just how much you could change the tables. I was pleasantly surprised at how much I could customize. It is a little hard to find so I thought I would outline what steps I took.

Step one: Insert table
First you select a table format that looks similar to what you are trying to accomplish. I selected the table that had a dotted line in the middle and a grey cell.

I picked the table that had a solid top line and the other lines were dotted.

Step two: Change number of columns and rows

To change the number of columns and rows first select the table and then touch the arrows on the bottom left and top right corners.  Change the number of columns to one and the number of rows to four.

Step three: Modify table

With the table selected touch the “i” on the top menu bar.  There are three different tabs at the top that you can choose to edit: Table, Headers, and Arrange.  (If you have a cell selected instead of the table then the last tab is “Cells”)  At the bottom of the defalt “Table” tab is “Table Options”.  Select this for more options.

Select “Alternating Rows” to OFF.  This will remove the grey shading from the second row.  You could alternately change the color by selecting the individual table cell background color.

You can also change the text size and grid.  If you select the correct table then you do not need to do anything with the “Grid Options”.  I was hoping to change the dash style of the middle line but that is not possible using Grid Options.

Select the table again and this time touch the “Headers” tab.  Change “Footer Rows” to 1 and this will show a dark line at the bottom of the table.

Step four: Finish the table

The table is basically finished.  You can copy and paste this table several times in the document.  Just select the table and select the upper left hand corner circle and there will be an option to copy the table.

Once you are happy with your table you can type or past words in the header row

Note:  If you are adding additional text you may want to change the arrangement.  If you select the table and touch the “i” to pull up the table options.  Then select the “Arrange” tab and select “Wrap”.  If you select “Move with Text” to Off more options will be available.  I like to select the wrap to “Above and Below”.  I also like to add a little extra Space around the table.

The Pages iPad table is now complete and ready to print out.

Homeschool iPad apps Part 2: Pages

Apple Pages for Homeschooling

20110503-073915.jpg
I was hesitant to purchase Pages for the iPad since I wasn’t sure it was worth it. I wanted an App to create documents. I also wanted to be able to make lines for copywork pages. In the end I bought Pages because I needed something to take notes at a conference I was going to the next day. I didn’t have time to search for different apps and I knew pages was rated well. Needless to say the it was worth it when I used it to take notes standing up during the standing room only first session I attended. Pages worked great for taking notes once I figured out how to outline.

Apple Pages is actually a pretty powerful document editor that can replace MS Word for most documents Homeschoolers may need to create. Ever since I had replaced my desktop computer a few years ago I have been without MS Office. One of the reasons I purchased the iPad was as an additional computer. Now for $10 I have a document creator App without buying Office. There may be some limitations to Pages but I believe for home applications Pages should be enough.
See how to make a copywork lined worksheet on the iPad with Pages here .